Showing posts with label DIY. Show all posts

Thursday, March 28, 2013

A DIY That Actually Worked!

Are you ready for this?
I did a DIY that actually worked!
The world MIGHT end.
No joke.
(It's also the worlds easiest DIY so....)

So, when we moved here we accidentally started the habit of getting Gizmo a squeaky toy every time we went to Target.
And now, any time we come back from a store he stands there watching us unload everything waiting for his toy.
And he makes the saddest face if there is no toy at the end of the unloading.
But he destroys those things in like five minutes and they're like five bucks a pop so we were getting sick of this.

To keep the pup and our wallets happy, I decided to re-purpose the destroyed toys.
I bought a bag of squeakers for way cheap on Amazon.

via Amazon

I cut open the hole in the toy a little bigger (I do not understand how he gets his nose in these tiny holes and pulls out the squeakers.  He's amazing.) and shoved a new squeaker in there.
I then sewed up the hole and just like that, brand new squeaker toy!

Worst sewing job ever, but Gizmo didn't mind.

Good as new!

Gizmo was happy as a little corgi clam.
I already have one hidden for when we get home from Target tonight!
He'll never know...


Saturday, January 19, 2013

Our Wedding Album

I have started and stopped making a wedding album for Mike and I over and over.
I'm just too particular and there are too many photos to choose from.
But the other day, Shutterfly sent me a $20 off coupon and I'm unemployed and I'll take any excuse to look at my wedding photos for about 5 hours so...I finally made one!
We got it in the mail yesterday and I just love it so much (I'm biased) so I figured I'd share it with you lovies.
(As much as it seems like it, this isn't a sponsored post, I'm just THAT excited about our album)

Tuesday, October 9, 2012

Bloody Mary's

Last weekend we had another cocktail party.
And I was a really bad blogger and didn't take pictures of any of it.
Including one of my favorite parts: our party favors.
Mike had the great idea of making Bloody Mary's for people to take home as party favors for the "morning after".
They turned out pretty darn cute.
Because I'm too lazy to recreate what they actually looked like, here is the one I have saved for me.


I love mason jars.  And they sell them in packs of 12 at Walmart for like 4 bucks.  Score.

And here are the tags we tied on with rope.
Rope also from Walmart.  We're thrifty people.


And here is the recipe to make your own Bloody Mary mix.  
Delish.
Easy.
Cheap.

Enjoy!

Ingredients
2 lbs. fresh tomatoes
1 lb. fresh carrots
6 fresh celery ribs
2 Tbsp. tomato paste
2 Tbs. horseradish root (freshly grated if possible)
1 tsp. celery salt
1 tsp. finely ground Maldon or another sea salt
 1 tsp. freshly ground black pepper
3 oz. fresh lemon juice
1 tsp. Worcestershire sauce
3/4 tsp. green Tabasco
1.5 tsp. red Tabasco

Tools
Sharp knife
Cutting board
Grater
Blender or food processor
Fine strainer
Wooden spoon
Large measuring glass

Instructions
Coarsely chop the tomatoes.  In batches, blend with any accumulated juices until completely pureed, and fine-strain into a large measuring glass pushing through all liquid with a wooden spoon.  You want about 2.5 cups of tomato juice.
Grate the carrots and coarsely chop the celery (leaves included), reserving any liquid.
Blend the shredded carrots and chopped celery in two batches with the reserved liquid and 1/4 cup of water per batch (if necessary) until completely pureed.
Fine-strain into the same measuring glass as the tomato juice, pushing through all liquid with a wooden spoon.
Transfer the veggie juice into a large glass jar, add remaining ingredients, secure with a lid and shake vigorously to combine.  The mix will keep refrigerated for up to two weeks.  Shake before each use.

*We doubled the recipe and it made enough to fill 10 of the mason jars.  We gave each away with a little vodka mini from the liquor store.  Cute, boozy, and homemade.  Perfect!

Recipe via Imbibe Magazine


Tuesday, July 17, 2012

C & J's Engagement Photos

Now hubs and I do not fancy ourselves photographers.
But our friends C & J have been engaged since December and hadn't had their engagement pics done yet.
And we were going wine tasting with them last weekend.
And we just so happen to have this fancy schmancy camera lying around.
So we thought, why not?
It turned out to be a great day filled with laughs, wine, tasty treats, and just lovely friends.
And the pictures didn't turn out so bad either!
Here are some of my favorites.


I know I know, you're not supposed to take pics in direct sunlight, but we didn't have a choice.  Next time, we'll do it later in the day!


THIS is why I love J so much, he's nuts.

This one is sadly blurry, but I still love it.


Saturday, July 7, 2012

Why Oh Why Do I Try DIY

So....
After I botched that paint chip art thingy I promised I wouldn't be doing DIY posts.
But....
I kept pinning friendship bracelet pictures on Pinterest.

Like this one:

Friendship bracelets

And this one:

DIY friendship bracelets

And this one:

DIY:: friendship bracelets

How cute are all of those?  And they look doable, so I couldn't help myself.
I used the tutorial over at Honestly WTF (best blog name ever btw)
And at first...I botched it.
Because, come on, it's me.  That's what I do.
I COULD NOT get the chevron pattern down.
So I cheated and did an easy braid and a fishtail braid.
And I think they look pretty cute.


I eventually read over the tutorial like four more times and figured out what they meant and now my chevron one is looking pretty good.
Of course, I made my first one way too short and turned it into a ring.


The best thing about this DIY is that when I showed Mike my completed bracelets, the first thing he said was, "Where's mine?"
Now that's a dude who is secure in his manhood.
Here he is rocking his friendship bracelet all weekend.


And I finally completed a pretty good one for myself.


If you want to attempt this DIY (and probably do it way better than me) read that tutorial five times, then buy a bunch of pretty thread OR this awesome kit at Walmart for only 4 smackaroos.
Then, grab a magazine to tape your bracelet to while you braid it, some tape, some scissors, and put on a good movie cause this is going to take forever.
Have fun!


Friday, June 8, 2012

DIY

There's a reason I'm not one of those awesome blogger girls with DIY posts on her blogs.
Although I'm creative and have great ideas, there is something in me that makes it physically impossible to cut in  a straight line or properly follow instructions so I don't end up gluing things on backwards.
But for some reason, I decided I could do this lovely DIY project without totally ruining part or all of our house.
Here, is what it should look like:

From the awesome A Beautiful Mess Blog.
She is seriously a DIY queen.

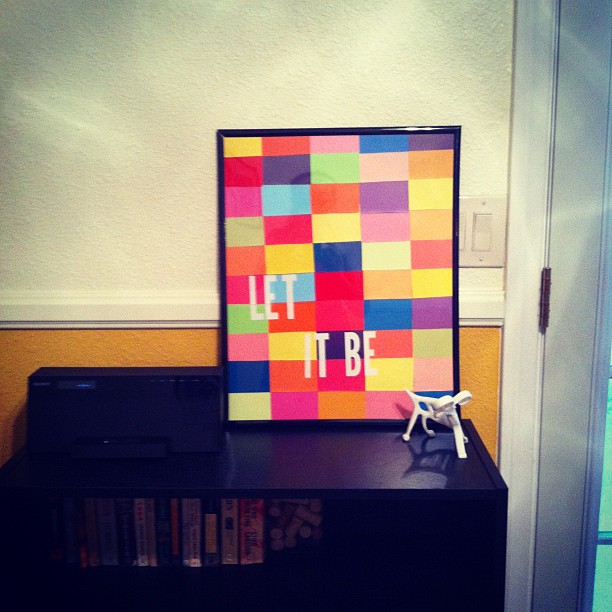
And here is my frightening creation:


Notice, if you will, that the entire thing is crooked and none of the squares are the same size and my letters are crooked and too small.
But, if you squint and stand far away, it looks pretty darn good.

Don't worry, I won't start an embarrassing DIY section of the blog where I cut off fingers and make wonky hair bands or something.


Sunday, January 23, 2011

Menus

Mike and I have gone back and forth about menus at the wedding reception.  We had started out saying we'd have one per table and we'd frame it in a cute frame rather than having one at each plate.  I designed something really simple and have been searching and searching for gray card stock to print it on.  Have I mentioned how hard doing your own wedding is in this damn town?!  Mike threw me for a loop the other day when he decided to announce that each guest should have a menu instead of doing the framed one per table.  I looked online and had picked out these from Wedding Paper Divas that matched our invitations.


I started playing with these today and got frustrated because they wouldn't let me cut out stuff I didn't want in there like our names.  I think if you're seated at the tables already...you know whose wedding you're at!  There also wasn't enough room for our entrĂ©es because their names are long.  I decided to make my own based on these.  What do you guys think??


I just have to order some white card stock and print them out.  Please give me your opinions if you think I need to change anything!

Saturday, January 22, 2011

DIY Project for the Day

We went over to the mo-in-law's house this morning and realized that she had quite a bit of fabric left over from the table runners she made us for the wedding.  By the way, have I mentioned how handy it is having a mo-in-law who is an amazing seamstress?!  Rather than renting fancier linens or spending more on centerpieces, I bought some fabric I love at the Online Fabric Store and mo-in-law sewed them into simple fabric runners for our wedding tables.  Super handy.

Anyways, we realized we had some extra fabric so I decided to use some of it to cover the cork board we'd planned to use for our escort cards.  This created a brand new DIY project for me and rather than thinking about it and planning, I did it right when we got home.  Thankfully, I didn't destroy anything so I can show you how I did it and my finished product.

All you need is:


A cork board/bulletin board, we bought ours at Target.  You're probably supposed to use one without a frame, but that's for people who plan ahead, not me!


Some fabric, ours is by Amy Butler and it's called Optic.  I looove it.  It's the perfect colors for our wedding and it's just modern enough for us.  If anyone wants a table runner in this pattern when the wedding is over...we have 3 extra!

A stapler, scissors, and a ruler.

You place the fabric face down on a hard surface, or if you're fancy like me, the floor.  Place the bulletin board face down on top of the fabric.  Measure your fabric so there is about a 1.5" border around the bulletin board and cut off any excess fabric.  We had some ratty edges on our fabric so I made sure to use that part for this project since it's not going to show.


Pull one edge of the fabric really tight and staple it to the bulletin board.  Make sure you pull it really tight so it doesn't cause wrinkles.  Do this all the way around the board.


That's it!  If you use a plain piece of cork board without a frame, you can then put a cute frame around the board, but I'm going to leave mine the way it is.  


I found some really cute yellow quilting pins at Walmart that I'm going to use to pin the escort cards to our board.  Bonus for the mo-in-law, she gets 100 yellow quilting pins after the wedding.


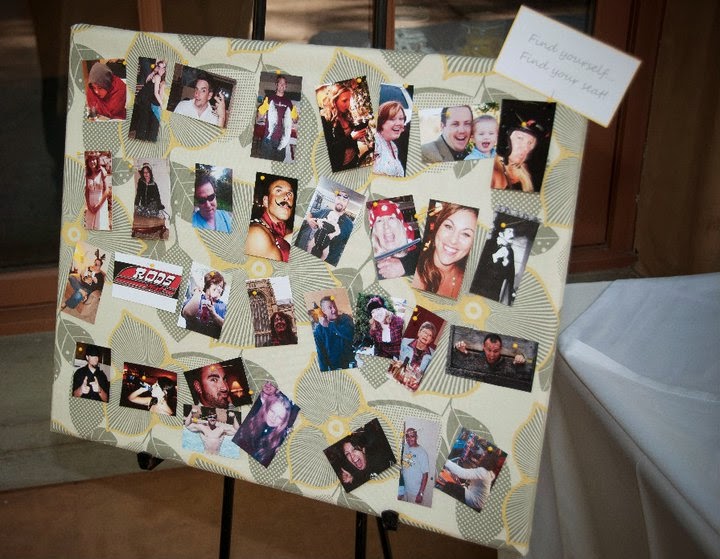
**Update:  the finished product at the wedding, I decided to use funny or embarrassing pictures of each guest instead of traditional escort cards. This is seriously my favorite thing I made for the wedding and it was a huge hit.


Saturday, October 30, 2010

DIY Fever - Welcome Bags

Last weekend, Mike and I took on our first DIY project for the wedding.  I am personally obsessed with DIY weddings.  I scour blogs like Project Wedding and Wedding Chicks for DIY ideas and the simple and unique weddings with DIY touches are always my faves.  I consider myself a pretty crafty person, my mom and I used to do DIY projects all the time making wreaths out of paper, making our own cards, we've even made our own jewelry.  I have great ideas all the time.  The only problem is, I have an incredibly short attention span.  I get all hyped up to do a project and then the second it gets irritating or difficult, I get bored and quit.  This is where Mike is a perfect match for me.  The second I get irritated, (or fussy as he calls it), he steps in, solves, the problem, and gets me back on board.  We're a pretty great team.

The project we took on last weekend was making our welcome bags for the wedding.  We're only inviting a small amount of people to the wedding and all of them are having to come from out of town and spend the night, so we thought doing welcome bags that will be waiting in each guest's hotel room would be a nice way to say thank you for making the trip.  I got this idea from a small post in one of my 800 wedding magazines with a welcome bag done by Sara at Woods & Company.  It was a super cute suitcase welcome gift filled with goodies about San Francisco.

I actually e-mailed back and forth with Sarah about having her do mine, but at the end of the day...I'm a cheapskate and wanted at least one DIY project for my wedding so I opted to do it myself.  So sorry guests, you're getting my handiwork, not Sarah's!  I feel a little bad for you...

I decided to do canvas tote bags as the container for our welcome bags so that our guests could use them again as grocery totes, (how very green of me right?!).  I ordered some simple canvas totes from Cheap Totes for only 99 cents each.  Crazy good deal!


Rather than buy already custom totes like a lot of places sell for about 14 bucks a piece, I ordered a design by the woman who did our save the dates at NMI Photo Creations.  She did up a cute design that matches our save the dates and only charged me 10 bucks.  This is a steal because I can use this design for anything forever and trust me, I love this thing, I'm going to be re-using it.  After that, it was just a matter of getting our DIY on.  Here is how we did it:

Print out your pattern onto iron on transfer paper. I couldn't find ANY in my stupid town so my bridesmaid Kristin bought me some out of town.  25 bridesmaid stars for her.


Keep in mind that even where the design isn't, there is going to be a shiny outline from the iron on paper so either cut all the way around your design, (which there was no way in hell I was going to do 19 times), or just cut off any excess you don't want showing.  Mike whipped out his razor blade and a round ruler, (because of course, he had to make sure it was perfect), and cut off rounded edges around each design.


Something Mike quickly realized while cutting the already printed out designs is that you have to be careful with them. Once they're on the iron on paper, it's really easy to screw up the design and scratch off parts of it.  Case in point:


Then lay out a pillow case on the kitchen counter.  Apparently, you need to do this on a hard surface, not on an ironing board.  Iron the pillow case and each bag to make sure they weren't wrinkly. Place the design face down onto the bag and iron it, putting a lot of pressure on the iron.


(Here's a side hint, don't wear a gigantic shirt and/or let your fiancĂ© photograph you from underneath when you know you're going to post pictures on the internet) One thing we came across when ironing is that the instructions say to iron for 3 minutes, but that is not nearly enough time.  We did each bag about 7 minutes.  This is probably because we were ironing onto canvas and not cotton.  Just tug at the corner and see if it is stuck on and if not, keep ironing.  Once you're sure you've ironed long enough, let it sit and cool for a couple of minutes and then, starting with a corner, pull the backing off.


And you're donezo!  Here is the finished product: 


I love them and can't wait for our guests to get them!